
Home » Posts tagged 'Node-Red'
Tag Archives: Node-Red

Hovercraft Instrumentation
At the request of Julian and Dave, here’s a post on what your ‘Friday’ started – Dave!
I’m an engineer and not much of a writer so here goes 🙂 I’m involved with a charity called Hoveraid. I help them out with practical stuff like when they’re out with the ‘craft doing demonstrations at public events in the UK. Here’s a short video and you’ll see why they captured my imagination.
They do great work in enabling other agencies to bring relief and aid to those who live in areas that are ‘unreachable’ by conventional transport – have a read of their site – there’s some great work going on!
So I was chatting to Andy about my Fridge controller and he asked if I could help him with a project for the hovercraft (craft). These craft are essentially very simple, agricultural machines (and that’s one reason that they do so well deployed in the field). The instrumentation is simple too with the minimum of gauges etc. But when things go wrong, there can be no warning. For example, Andy told me that it would be very useful to be able to monitor the temperatures of the bearings of each of the fans – the River Rover has 3 fans – 2 for thrust and one for lift ad they each have 2 bearings. Well, I said, I can measure temperature! And so the project was born.
A project like this is only possible when things come together! First there was Hoveraid’s need and I know I could build a system that would measure temperature. I know also that I’d need to display it and the River Rover dashboard lends itself to the use of 7in screens – conveniently available! Now, I could have used a simple controller like and Arduino but that meant running wires the length of the craft so decided to use an ESP8266 – after all its wifi, more ram and more power than an Arduino anyway.
At the display end I was looking for a robust solution that would be somewhat resistant to the dust and humidity of Madagasacar – or anywhere else in the world. I initially thought of using a PI as a hotspot to collect the MQTT’d temperature data and display it using node-red and node-red dashboard but as it turned out the PI was an unreliable hotspot – I couldn’t connect more than one of my ESP8266s to it whereas they would all connect to any other routers.
And then it was Friday and Dave CJ posted this on the Node-Red Google group. So I tried it on my phone and it worked. I now had the display and router solution. With my phone configured as a wifi hotspot, and with an MQTT broker and node-red running on it, I saw the potential of having a robust display which gave me a 2-component but very expandable system with the potential of multiple modules all over the craft supplying data via MQTT to node-red and its dashboard. (Pete Scargill has a few great articles on node-red and other matters – well worth a read).
So after reading all that – here’s a nice video to remind you what its all about 🙂
The Tech Bits
This project is so simple its not true. An ESP8266, a pullup resistor and as many DS18b20s as you need. Add, Nick O’Leary’s pubsubclient for MQTT messaging to the DallasTemperature library and you have all the essentials. I chose to poll the sensors (powered – not parasitic) every 2 seconds and publish each sensor’s data as an individual topic. This makes for easy configuration (and made the most sense since I don’t have the Javascript skills to allow me to process the payloads in node-red).
So here’s the box. (I’m just off to Screwfix to get a bigger one since I had to swap out my cheap Chinese power supply for a more robust potted one that is a bit bigger).

The magic happens in node-red.
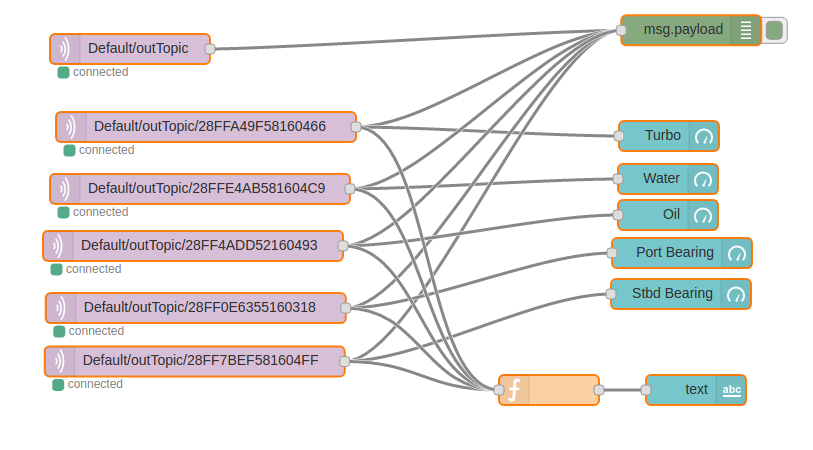
When the ESP system starts, it publishes a list of the sensor IDs to outTopic. This allows you to make a node for each sensor and assign a function to it. Then you can assign the appropriate dashboard element to each temperature. The function is a simple heartbeat that puts the current time into the payload every time a temperature is received. (Hint: it would be so nice for that to be an optional element in each dashboard item :))
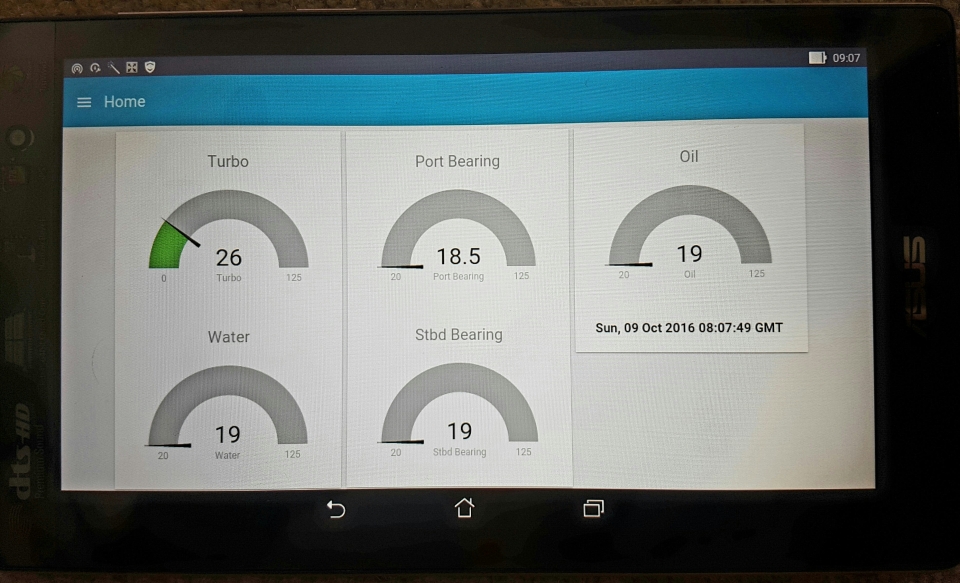
River Rover 7 in screen
I didn’t have a 7in tablet to test and deploy this on but one of the wonderful things about working with a charity is that some of our supporters use social media so Andy asked if anyone had an old Android 7in tablet. Then the next wonderful thing happened! Within a matter of hours we had a new tablet!
With Andy CJ’s instructions and some hints from Peter’s blog comments I soon had an MQTT broker and node-red running (although I’m still having trouble getting it to start up as a Wifi hotspot and then to run node-red automatically). I use the default Android browser in kiosk mode – (ask Google :)) It works well!
So there you have it! Its a really simple, expandable system made possible by the contributions of so many. Its impossible to mention everyone but I’m very grateful for your efforts in making this possible!
Of course, this isn’t the whole story. This is only the prototype. We are in the middle of putting a new engine into the Griffon 1500 – a much larger craft.

This has a larger cockpit so I’m envisioning 10 in screens in here with all sorts of performance parameters. The new engine will have CAN so that will be another integration challenge. This project is moving slowly as refurbishment is an expensive process and since we depend on donations and volunteer labour it moves forward as and when funds and people are available. We’re always looking for help so if you would like to be involved, take a look here and here 🙂
I’ll update this article and or write more shortly. Andy is taking the ‘system’ out to Madagascar in the next few weeks for field testing so I’ll let you know how it goes!
Smart Freezer Controller
One of the natural spinoffs from doing an radio license is that you get a natural interest in electronics. So it has been for a few years but I’ll leave the history for another day.
Its been a few years since my friend Rick build his own fridge controller for the Danfoss compressor that keeps the food cool on his boat. I was tempted to build my own but it wasn’t until the ESP8266 came along that I decided to get going with it.
I had a false start or two with a board I got from Aliexpress that didn’t have all the required pullups on it and this was at the stage where there was very little information available on how to correctly use the device. Along with that and never having done any hardware or firmware development, it was challenging. Happily I’d done some programming but never C or C++.


Anyway, This design has now transitioned from breadboard to PCB and is ready for final testing and connection.
The main processing is done by the ESP8266 with the addition of a PCA9685 to run the PWM. I took the decision to use the PCA9685 since it has the dual benefits of having a better PWM output, particularly at higher frequencies and it will allow me to sleep the ESP8266 and reduce the overall power consumption.
The aim of the project is to make the freezer smarter. The current controls for the Danfoss consist of a fixed resistor for compressor speed control and a simple thermostat. This system has many disadvantages. The compressor speed is fixed and therefore consumes more power than optimal. The controller cannot take advantage of power when it is available such as when the engine is running or the solar bank has charged the batteries. The new controller is wifi connected to the boat network and is controlled by MQTT that reports the battery voltage so that it knows what mode to run in. It uses node-red and node-red dashboard for monitoring. Other smart features built in (to the node-red nodes) are features that switch the freezer off during HF marine radio nets as the BD-50 controller is known for producing RF interference. Should the worst happen and the wifi go down, the controller will revert to a fallback mode and keep everything frozen but without the benefit of some features.
Other features for easier management when installed on the boat (think cramped spaces and things hidden away in corners) are the ability to update the firmware OTA.
Update: I’ve had a few requests for more detail and what’s been holding me back is that since I’ve been learning C++ as I go along, the code is truly shockingly bad so I’m reluctant to release it. However, this is a very straightforward project. Can I say at this point that its ONLY for DC DANFOSS COMPRESSORS and I TAKE NO RESPONSIBILITY FOR ANY DAMAGE YOU DO TO ANYTHING OR PERSON. You assume all risk 🙂
Anyway, all you need is an ESP8266 – a 12 or better if you can since the added memory will allow you to do the OTA. In addition you will need:
- PCA9685 board from Adafruit or somewhere else
- DS18b20 – get one with a longer lead – preferably the waterproof, sealed type – you’ll need a resistor pullup
- I also use a single channel 4N25 optoisolator which is driven by one channel of the PCA9685
The software uses the Adafruit PCA9685 library and also the excellent DallasTemperature library. I especially like the DallasTemperature library since it provides access to the DS18b20 sensor ID. I’ve used this feature in another project I’ll write about soon.
I started by wiring up the DS18b20 and reading temperatures from it. Then I added the PCA9685 (I went via using the ESP for PWM to modulate the output voltage but I found that there was a bit of a hiccough when the wifi was working. I wanted the output to be as smooth as possible and therefore chose the PCA9685.
So after I got the temperature side is working, I looked at the output side and implemented the PCA 9685 – I had to resist the temptation to fill the fridge with flashing LEDs as to use up the other channels! The Adafruit library makes this very easy.
Then I wrote the control loop that switches the output on the PCA9685 according to the temperature of the fridge. You can have a lot of fun with this!
Anyway, there’s a quick update – the solution is up and running reliably on the bench – now I need to get it installed on the boat – more later!
